LMS | Tutorial of the Week
Page 2 of 2
Creative Applications of Moodle's Choice Activity
Sometimes the simplest features in a course management system are easily overlooked or dismissed. One of those features in Moodle is the Choice activity, which at first glance can appear as too stark to merit scrutiny.
This feature, which — for good or bad — lacks any type of built-in grading function, allows a teacher to create a number of options from which students are limited to choosing but one. It also lets the teacher limit the number of students who can select that option and set date ranges during which students might be able to change their responses prior to closing (as opposed to locking them in with their first choice).
The publishing features available for Choice underscore the robust nature of this simple activity. Restrictions on when results are released and the level of student privacy remain in control of the teacher. Aggregate student responses can be hidden (do not publish), immediately displayed after a student selection is made, available only after the activity is closed or set to always show results. The ability to release results anonymously or with usernames included ensures privacy control. Anonymity grants safe passageway for students that may otherwise feel too exposed when responding to sensitive questions.
If the predominant use of your Moodle course has been to deliver resources to students (files, videos, URLs), Choice will allow easy expansion into using more interactive activities within a course. If already an advanced Moodle user, this may be an opportunity to expand the usefulness of this potentially overlooked tool.
A straightforward example of the Choice activity from the student perspective is shown in fig. 1, while fig. 2 shows the report that is seen by the teacher after someone has made a selection.
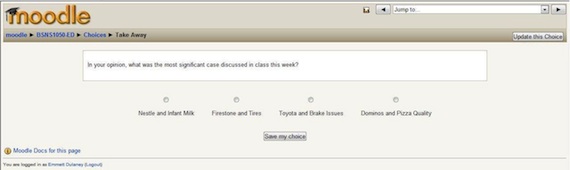
Fig. 1: A simple example of the Choice option. (Click for larger image.) |
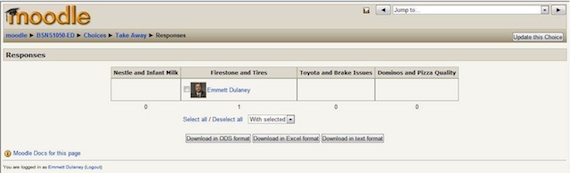
Fig. 2: You can view the responses and download them for further evaluation. (Click for larger image.) |
The following discussion shows a number of creative ways of using this activity for purposes other than simply ascertaining the most significant takeaway for the class/week/course. NOTE: While core features in Moodle remain generally consistent, some features in Moodle may differ depending on the version of Moodle in use within your institution.
Limiting Group Size
Choice can come in handy any time you need to limit the number of individuals able to make a selection and are willing to do so on a first-come, first-served basis. For example, twice a year the Faculty Development Committee at our school hosts development days, which often include breaking into smaller discussion groups to elaborate on the day's topic. The size of these discussion groups is limited by the size of the classrooms available for use on those days.
Fig. 3 shows an example of a Choice activity intended to allow faculty to choose which discussion group they want to attend on that day. The number that can choose each option is limited to the size of the room that has already been assigned to that topic and when one fills up, as is the case with the Civility in the athletic arena option, no one else is allowed to use it. That offering will be held in a room that seats only 20 and thus that option is limited to that number while all of the others are set to higher numbers ranging from 30 to 100. On the day of the discussion groups, a report can be printed out and used for attendance in each of the classrooms.
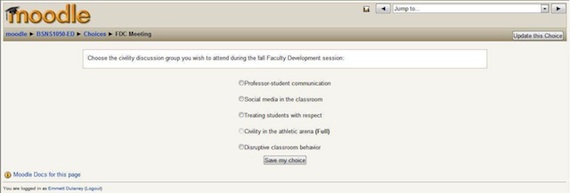
Fig. 3: Using Choice to limit the number of attendees in each discussion group. (Click for larger image.) |
Using HTML Options as Choices
In addition to using text options with Choice, you can also use anything that you can supply a local or Internet path to. As an example, the options shown in fig. 4 are visuals that test students on which book cover fits the criteria discussed in a marketing class on that day.
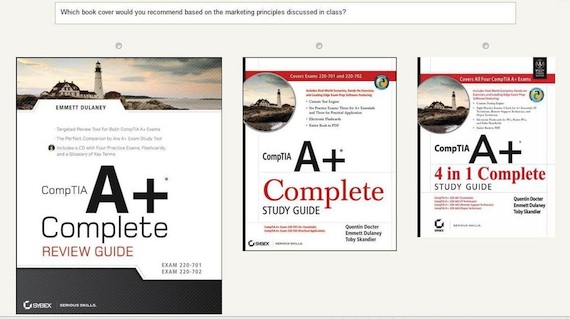
Fig. 4: An example of using icons for the Choice options. (Click for larger image.) |
In order to use images, the choice is given in HTML format. In this case, that format is:
Instead of book covers, the URL could just as easily point to other types of files (video clips, sound files, etc.).
One item to note is that Choice allows you to choose whether you want the options displayed horizontally (as in fig. 4) or vertically (as in fig. 3). Owing to space constraints on the screen, it is easier to fit larger choices in by choosing vertically, but we've experienced problems with lower choices rarely being selected if they don't show on the students' initial screens and they have to scroll down to see them. Our recommendation is to try to size options (whether they are images, word choices, etc.) to where they all appear on the initial screen whenever possible.
Automating the Ultimatum Game
In discussions of price theory, the Ultimatum Game can be used to illustrate behavior. As originally constructed, half the subjects are each given an amount of money for no real reason and told that they must share some of it with one other subject who was given nothing. For example, Subject A is given $20 and told that he must offer some of it to Subject B. If Subject B accepts the offer (for example, $5), then both Subject A and Subject B get to keep their respective amounts. If Subject B declines the offer, then neither of the two of them get to keep anything and thus the exercise is one in negotiation and human nature. (See
howstuffworks.com/ultimatum-game.htm for a more complete explanation.)
We have found that rather than using money, it is possible to teach the same principle by using bonus points. On a day when no one is expecting it, the class is divided into two groups with the second group sent to an empty classroom. All members of the first group are then told that they have 20 bonus points to split between themselves and an anonymous member of the second group so come up with an offer that won't be rejected, or they both receive nothing.
At this point in the past, we then passed out index cards on which they could write their offer. The only marking on each card was a numerical number we created to be able to identify the two students involved in each transaction without their being able to figure out who they were bargaining with. We then collected the cards, went to the second classroom, explained what was going on, disseminated the offers, and collected the cards. Both groups were brought together and the tallying began.
This year, the game was modified a bit by removing the cards from the view of the second group and allowing them to see all bonus point offers the way one would when purchasing items in most electronic options. The second group was sent to a computer lab instead of an empty classroom. In that lab, they logged in and were able to see the offers in Choice as we added them (which was done as each member of the first group turned their cards in). The second group members could accept an offer as long as it was available, wait to see if a better offer would appear they could jump on, or reject all offers and end up with no points (as well as penalizing those who made the low offers that no one accepted).
By updating the response screen in the classroom after the last in the group had turned in their card, it was possible to watch the offers get accepted and see which student in the second group was making the acceptance. Surprisingly, the results closely mirrored those that used the cards even though members of the second group could now see all offers and not just the one that was handed to them. When they were left with low offers, they chose to reject them — just as they did with the cards — and gain no points for themselves so they could let the student making the low offer know what an insult it was and cost them their points as well.
Assess the Composition of a Class
What teaching resources resonate most with a unique group of students?
Such an insight may emerge in face-to-face or Web-assisted courses, but online courses make the learning potential of your class less overt. Choice allows a teacher to map student access to technology and/or discover individual learning styles. Knowledge of whether a student has access to a laptop, desktop computer, tablet, or Smart phone allows for targeted instruction. Course technology requirements can be accurately matched with the real-time data of student response. Choice can also allow for mapping individual learning styles. Begin by pasting a URL to a Web-based learning styles inventory in the description box on the choice settings page, highlighting it, and using the hyperlink icon to make it active (paste the Web address in the link URL field). We also recommend setting the target field to "open in new window" so a student can take the inventory, close the tab, and see the choices in the existing tab (see fig. 5). There are several free learning style inventories available to educators on the Web. Set up the Choice inputs to reflect the potential styles for each student (auditory, visual, or tactile). While these styles do not fully describe the learning potential of your class, they may allow alternative learning possibilities to emerge.
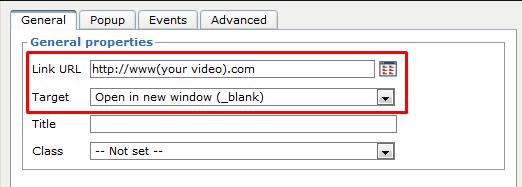
Fig. 5: Add Link Address and Target When Inserting a URL in Choice. |
Track Progress of a Student Project
Choice can act as an accountability tool for students completing semester long projects. At various points throughout the semester or term, insert a choice activity to track and document student-reported progress. Choice inputs for student selection can reflect the various stages required by the teacher toward completion of the project. Publishing options allow responses to remain unpublished or posted anonymously as a potential motivator for students suddenly realizing they are lagging the group.
Allow Students to Vote on Course Content
After the foundational concepts of a course have been laid it can be beneficial to allow students to guide future content. Inserting a choice early in the course and allowing students to pick from several future topics, provides a level of ownership over the learning process.
Flip a Video
Video resources have enhanced online teaching for several years now. The choice activity allows a video to be "flipped" into a simple lesson, making a video interactive rather than passive. To begin, add a content question in the description box on the choice settings page, then embed a video below. To embed a video, click on the HTML icon (fig. 6) in the toolbar of the description box, and paste the embed code of the video in the HTML source editor (to find the embed code for a YouTube video click on the share link under the video, select the embed link, and copy the code). Student comprehension of the video can be assessed by their responses to the content question you posted previously.
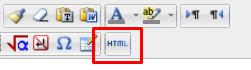
Fig. 6: Locating the HTML source editor icon to embed a video. |
The Choice activity is one of the simplest available in Moodle, but its implementation is limited only by your own imagination. We encourage you to experiment with it and find creative ways to integrate it into your curriculum.
If you need to ask more than one question of the students, and still do so in an ungraded format, then Choice is not for you. The Feedback activity offers this capability and we will focus on the potential it holds next month.