How to Use a 3D Printer to Get Students into Design and Engineering
- By Kristal Kuykendall
- 02/08/22
 With a growing demand for ways to pique students’ interest in STEAM fields and incorporate design and engineering concepts into classroom activities with tangible results, teachers are sharing industrious ways they’re doing this for all their students using just one piece of hardware: a 3D printer.
There are many types of 3D printers, but as their popularity grew and the technology further developed, prices have fallen in recent years, with personal 3D printers retailing for as low as $250 and hobbyist 3D printers ranging fro $300 to $1,500, according to Fusion3 Design.
Two teachers from Alief ISD in Houston, Texas, Daniel O’Kilen and Carolyn Dersen, share their enthusiasm for using 3D printing to entice students to learn STEAM concepts with anyone who’s interested; at a Tuesday session of the annual convention of the Texas Computer Education Association in Dallas, they walked attendees through the details of their guide “11 Classroom Lessons To Use With Your 3D Printer,” which they made available for download as a Powerpoint presentation along with all the lesson materials and teacher instructions.
Every lesson uses either the Tinkercad, Blender, or SculptGL platforms and all are free.
The lessons include detailed instructions on designing and building the following:
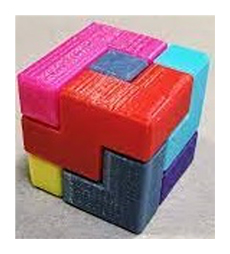
- A 3-by3-inch puzzle (think Rubik’s Cube)
- A balloon racer
- Holiday ornaments or earrings
- Double message text paperweight/figure
- Silhouette goblet
- Face on a model of Mount Rushmore
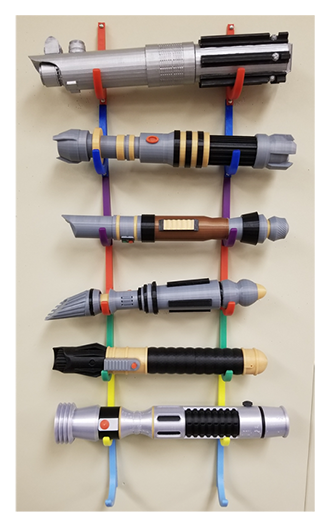
- Lightsaber
- Star Trek Federation ship
- Impossible creature
- Skeleton into a lifelike animal model
- Real-world solution (think cellphone holder or light switch cover)
The first example lesson is the puzzle challenge, where the initial step has everyone in the classroom creating the same puzzle pieces as they walk through the tutorial video. Next, students open Tinkercad, and either individually or as a group design their own puzzles.
The challenge requires that each puzzle has six pieces, the pieces must be saved separately (so they can be printed individually), they must be printable without supports (to meet 3D model orientation and printing parameters); and the pieces must fit together to make a cube.
 Are your students totally new to Tinkercad? The holiday-themed ornament lesson is a good fit. During its three video tutorials, students learn how to use the basic tools of Tinkercad to create their own basic objects as they’re guided in designing a variety of holiday ornaments . The project concludes with students printing out the custom ornament they designed, and the lesson also can easily be converted to create earrings, instead.
In another example shared by O’Kilen and Dersen, making a silhouette goblet, the lesson begins in Photoshop, where students turn a profile photo into a silhouette. Next, the lesson teaches them how to duplicate and flip the silhouette to create a vase shape between them, and the vase shape file is imported into Tinkercad where it is turned into a 3D object. Students learn how to spin their object to get a goblet, add a “hole” to create a bowl or cup shape, and then each design is printed out in real life.
The lightsaber lesson is a little more complex, challenging students to design and print multiple primitive shapes that fit together to build a larger object, a lightsaber in this case. The video tutorial walks students through the process using the Blender app, but it can also be used in Tinkercad, according to O’Kilen and Dersen.
For students who have had some practice at 3D design and printing, the guide includes a final or culminating project, solving a “real-world problem.” The directions include examples and tips to help students through the problem-solving cycle, but there is no video tutorial or step-by-step instructions; instead, the lesson challenges students to identify a problem they wish to solve with their creation, which can be designed in any 3D software. Some examples included in the teachers’ guide are a mobile-phone holder and a light-switch guard.
About the Author
Kristal Kuykendall is editor, 1105 Media Education Group. She can
be reached at [email protected].