Makerspaces
Tips for 3D Printing in Schools
3D printing is a technology that can be as complex or as simple as you make it. These ins and outs can help you simplify how 3D printing works in the classroom.
- By Dian Schaffhauser
- 07/09/19
3D printing is a technology that's fast evolving and difficult to follow. To help educators get past some of that difficulty, siblings and 3D printing experts Jonathan and Stephanie Torta wrote a new book, 3D Printing: An Introduction, directed at people in education and industry who want to pick up myriad details of 3D printing and make 3D printing a part of students' learning experience.
Recently, they shared tips for 3D printing that are worth understanding when you're using it in your classroom.
Locating Curriculum and Project Ideas Is Easy
The sister and brother team have found ample sources for 3D printing projects. To find curriculum tied to state learning standards, Stephanie suggested starting with the state departments of education or regional service centers, such as the BOCES in New York, ESDs in Washington or ESCs in Texas, and, in particular, the STEM resources they make available. The printer companies themselves also offer lessons, including examples from Ultimaker, MakerBot and Tinkerine. And there's always NASA, the Smithsonian and your local library or museum to provide unique 3D designs to fit a specific unit.
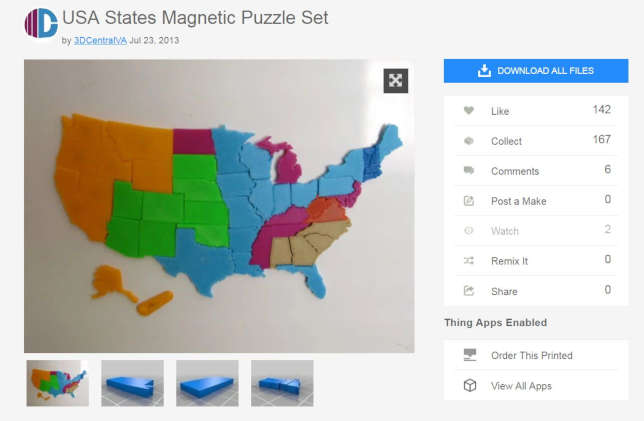
Jonathan said he's seen classes print out crystalline structures and atoms and molecules for science classes, fit-together states for geography lessons and other "building blocks that the school may not be able to afford or have stashed in a cupboard somewhere." Even in those cases where the students are downloading pre-designed objects, "they're still printing out the parts, they're still choosing the colors, they're still assembling them, they're deciding which ones to pick, and the final product project is part of them. They made it."
Choosing a 3D Printer
While the Torta book provides ample guidance for choosing the right 3D printer, Jonathan does offer some specific advice. First, you'll probably choose a printer that uses FDM, the plastic filament that's heated up and extruded layer by layer to build the object being printed. As he noted, "There are a couple of different grades and levels of those." How do you make the right choice?
First, decide whether you're "DIY-minded and willing to get your hands dirty" or need a greater level of support. For one, you can find plenty of models under a thousand dollars that you'll need to maintain yourself. For the other — at the "prosumer" level — you can expect to pay $2,000 and higher and get a level of support akin to what you get with your copy machine. What kind of support would you need? If the printhead goes wonky in the higher-end models of 3D printers, Jonathan suggested, "you send it in they send you a new one." He strongly discouraged staying away from cheap "knockoffs," since they "source the parts as cheaply as possible and they tend to have a very short life span."
Second, pay attention to the size of printing capacity. A generation of "ultra-small" 3D printers have come out that produce objects only a couple of inches in size. A respectable size would be about 200x200 millimeters, he said, closer to 7.5 inches on all sides.
Third, choose a printer with a heated bed — the surface that the object is printed on. Jonathan said the use of the heated bed "allows you to use a wider range of materials and helps with the adhesion of the plastic itself to the bed." The really inexpensive printers typically work primarily with PLA, he added, which is "strong but can be fairly brittle." In fact, most 3D printer pros use PLA primarily for prototyping. "If you have a printer that allows you to print in some of the other higher temperature plastics, then it will also be able to print PLA."
Taking Advantage of Free Design Apps
Autodesk's Tinkercad and Meshmixer and 3D Builder from Microsoft are just three of the many free "beginner" programs referenced by the Tortas for creating and editing 3D design files, what you'll feed into the printer when your students are ready to create their objects. According to Jonathan, these "allow you to quickly and easily make 3D objects" on a computer or tablet. Some are as simple as using "primitives" (common geographic forms) to assemble objects and others use "building blocks — like Legos."
In the book, the siblings suggest assessing the design programs you work with by five components:
-
File formats: Make sure the program can open and export the formats you're using in your 3D printing workflow;
-
Features: The tools included with the application (more on this shortly);
-
Complexity: Steepness of the learning curve and availability of tutorials to expedite the learning;
-
Operating system: Not all applications run on all computers; and
-
Overall cost: While plenty of design tools are free, others have costs involved.
Finding Faults as Part of Learning
Before an object can be printed, the digital file needs to be "sliced" (converted into the thin cross-sections that the printer will layer on its bed during the printing process). And then it needs to checked, as Jonathan explained "to ensure it's manifold and watertight" — that it has a "contiguous and defined exterior and interior."
Source: Thingiverse
Slicers and file checkers are among the "features" included in some of the 3D design programs. Some also "highlight problems in the skin of the object and allow you to attempt to fix it or fix it themselves," said Jonathan.
In the classroom, this part of the workflow can serve as a "gate." The design can be run through a checking program, and the teacher can tell the student that until the file is approved by the software, he or she can't get access to the printer. "The last thing you want to do is have a failure because you didn't check it," he noted.
Using Supports Correctly
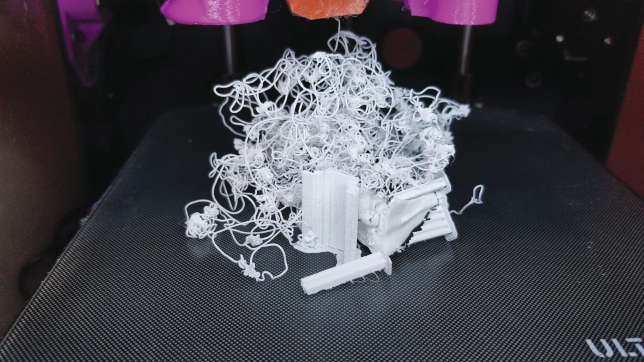
Students (and their teachers) soon figure out that even when an object is downloaded from a website such as Thingiverse, a library of 3D designs, that doesn't mean it was created with 3D printing in mind. As Jonathan explained, "It could be just something that was scanned and then turned into an STL file later or designed by someone who didn't think about orientation or how to print it later." As a result, the object could "very well require a lot of support or scaffolding to hold it while it's printing."
Supports are printed structures that hold up the object being printed when insufficient base material touches the printer bed. As the book pointed out, "The objects and all its parts that do not touch the build plate or extend past the 45-degree overhead angle will have little to no first layer of filament to build on." Without the scaffolding, during printing, those parts of the object "can create a drooping effect, curls or... 'nests' of plastic."
Frequently, printers have configurations where scaffolding can be turned on or off. If scaffolding is on, said Jonathan, its presence "could mar the surface, be hard to remove and use a lot more filament." His advice: let the slicing software "do what it thinks is appropriate."
Ventilation Matters
Anytime you heat up plastic, there's bound to be toxic fumes. But the level of toxicity depends on several factors. "If it's a large space and you have a single printer, it's going to make particulates in the air similar to someone frying something on the stove," said Jonathan. "If you have more than one printer and you have them running continuously, make sure to add specific ventilation." That could be provided by an extra fan, a vent to the outside, a carbon filter or placing it into an enclosure.
Also, he suggested, there's a commonly held belief that PLA is "harmless because it is organic and smells good." This isn't the case, he said. "Whether it's natural or not, it's still giving off fumes."
Figure Out Filament
In the early days of 3D printing in K-12, filament was a pricey component and teachers had to guard their spools carefully to make sure they didn't get halfway through the school year and run out of supplies. Now, said Jonathan, the price is far more affordable.
Stick with the filament your printer specifies and look for "dimensional accuracy" of between 0.02 mm and 0.05 mm. (The lower, the better.) If the filament is too large, it will jam the printer head; if it's too small, it might stop feeding altogether. The two main sizes for desktop-grade 3D printers are 1.75 mm and 3.0 mm.
Source: Jonathan Torta
Make sure that the filament is properly packaged so that the plastic doesn't absorb humidity. You can tell when that's happened because the plastic will spit and splatter as the plastic melts and the trapped moisture turns into steam. His advice: store filament in plastic zip bags or plastic containers with silica gel packs.
Also, if the cost sounds too good to be true, it could be old filament that somebody is trying to get rid of, generating filament "age issues" during the printing.
Filament needs to be calibrated, which the Tortas said is a simple process. The manufacturer will suggest a temperature range. While Jonathan said he prefers to keep it to the lower end of the range, the only way to know what works is to do a "basic test block" that allows you to "gauge the effects of temperature over a range of settings."
The flow rate setting for the extrusion of the filament is also important to fine-tune. He suggested printing a solid cube at 100-percent fill and check for too much or too little plastic. "Under-extrusion" will show up as gaps between the perimeters and the infill; when that happens, the flow rate needs to be increased. "Over-extrusion" results in a print job that looks "messy, gloopy and overstuffed"; that requires the flow rate being decreased.
Another tip: If the printer has become the bottleneck and students are producing draft prints, bump up the size of the layer height for faster printing. "If I were printing out something at 0.1 mm and bumped it up to 0.2 mm, that would take half the print time," Jonathan explained.
Keep Track of Settings Used
Once the printer and the filament are calibrated, the Tortas recommended the use of a journal and "slugs" for keeping track of the data.
Jonathan suggested keeping a log of every print made with the basic settings and "ideally, what you changed beyond the default settings." As he wrote in the book, "all of this allows you to understand and quantify how changes in basic or advanced settings can affect other settings," including changes in the environment and how different combinations of filament type and heat can affect the print cycle.
"Benchmark slugs" with a hole can be produced with the printer and then notes recorded on them to identify filament type and temperature information. These can then be attached to the filament spool or string for quick reference on settings before a print job takes place.
Using the Right App
3D printers have become more foolproof with every passing generation, said Jonathan. For example, the latest Prusa line (available in kit form or fully assembled) will try to recover if the printer head "crashes and moves a little bit." Normally, he said, that would result in a "weird offset print," but in this case, the printer will try to correct the problem before that happens.
Just as importantly, apps such as OctoPrint and Astroprint have surfaced that provide remote control monitoring of the printing process. OctoPrint, for example, is a free application that generates data about the progress of a print job, including temperatures, and works with webcam to allow the user to see the printing. The print job can also be started, stopped or paused. Because it's an open source project, said Jonathan, "people are making interesting plugins for this." For example, one plugin recently contributed to the community allows custom file types to be uploaded via the OctoPrint web interface and another one displays print progress on an Apple Watch.
But 3D printing isn't an end in itself; it's a tool that can help students think in new ways. "You can use to use it for creative thought and problem-solving, helping get students engaged and able to analyze not only their successes but their failures," Stephanie said.