12 Advanced iPad Tips All Educators Should Learn
Split the iPad keyboard by tapping the keyboard key to make it easier to type using your thumbs.
|
It's no secret that the iPad has become a big hit with educators, due in part to its ease of use and the more than 20,000 educational apps available in the App Store to meet a wide range of learner needs. But are you and your students really getting the most out of its use? At FETC 2013, Jennifer Hart and I presented a session where we shared a number of advanced tips to make finding, sorting, consuming, and creating content on the iPad easier and more efficient.
Since I work in the field of special education, many of these tips mention the built-in accessibility features of the iPad. The iPad is an excellent tool for implementing the concept of universal design for learning (UDL) in the classroom because it allows students who have special needs to use the same device as their peers, but with a number of built-in supports that allow these students to more easily access and create content. The tips I mention here assume you are running iOS 6, the latest version of the iPad’s software at the time of writing.
1. Shine a Spotlight.
As the number of apps you have installed on your iPad grows, it will become more difficult to quickly find a desired app when you or your students need it. Fortunately, the built-in Spotlight search feature can help. To use Spotlight, click the Home button (or swipe to the right) while you are on your home screen. As you enter the name of an app in the search field at the top of the screen, a list of suggestions will appear below. Tap the name of the desired app once you see it on the list and off you go. Spotlight can even search your contacts, music, e-mail, and other information on your device. To determine the information included in Spotlight searches, go to Settings > General > Spotlight Search.
2. Everything in its place.
Another way to save time when looking for apps on your iPad is to keep them organized with folders. Before you can create a folder, you must first tap and briefly hold on any app to enter a special editing mode where the apps appear to “shake” or “dance.” Once in this mode, you can simply drag and drop one app on top of another. iOS will try to guess a name for the folder, but you can choose a different name as needed. You can organize apps by task (podcasting, QR code scanning), topic (math, reading), or intended users (first period, art class). You can have up to 20 apps in a folder on the iPad.
3. It's all in a gesture.
Multitasking gestures were introduced in iOS 5 and are one of those “set it and forget it” kind of features. Once you enable these gestures by going to Settings > General > Multitasking Gestures and tapping the On/Off switch, you can switch apps by swiping to the left or right with four fingers. You can also close the current app by pinching in with five fingers instead of clicking the Home button. Swiping up with four fingers will reveal the multitasking bar at the bottom of the screen with a list of recently opened apps. As a bonus, swipe to the right with one finger on the multitasking bar after performing the four finger swipe up to reveal “secret” controls for your screen brightness, music playback, volume, and more.
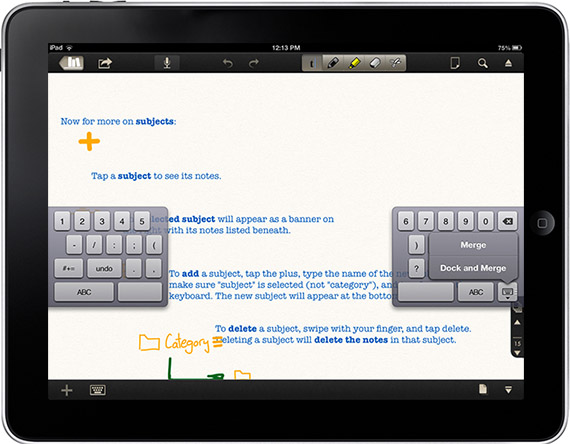
4. Let your thumbs do the work.
The iPad onscreen keyboard can be split to make it easier to type with just your thumbs when you are holding the iPad with two hands. To split the onscreen keyboard:
- Tap and hold the keyboard key (lower right corner of the keyboard) and choose the option to split the keyboard (you can also undock it to move it out of the way if you need to see the bottom of the screen while the keyboard is visible).
-
Or, use two fingers and unpinch the keyboard to split it (pinch in to merge it again).
5. What does it mean?
If your students don’t know the meaning of a word while reading a web page or ebook, they can easily look it up without having to exit the app or book. To look up a word with the built-in dictionary, tap and hold on the word, then select “Define” from the popover menu. Tapping outside the popover will dismiss the dictionary and allow the student to resume reading where he or she left off.
6. It speaks.
Although it is an accessibility feature intended for people with low vision, Speak Selection can benefit struggling readers as well. To take advantage of this feature, you must first enable it in the Settings by going to General > Accessibility > Speak Selection (under Vision). There you can adjust the speaking rate (I recommend setting it about a third of the way in for most students) as well as enable word highlighting. This option highlights the words as they are spoken aloud, which can be helpful to readers who tend to lose their place as they read. Once Speak Selection is enabled, you can use it anywhere you can select text. Simply tap and hold a word or phrase to reveal handles you can use to make your selection, then tap Speak from the popover menu to hear the text read aloud.
7. Mirror, mirror on the wall.
Starting with the iPad 2, you can connect the iPad to a projector or HDTV and mirror what appears on the device’s screen. You can either connect the iPad directly to the projector or HDTV using one of the special adapters available from Apple, or you can mirror the display wirelessly through an Apple TV. The wireless option will allow you to move around the classroom to answer student questions and make sure they are on task. Wireless mirroring requires your iPad to be on the same Wi-Fi network as your Apple TV. To mirror from your iPad, double-click the Home button to reveal the multitasking bar, then swipe to the right with one finger and tap the AirPlay icon (note: this icon, which will appear to the right of the playback controls, will only be visible if an Apple TV is available on the same network). Next, select the Apple TV and tap the On/Off switch for mirroring. If you do not have an Apple TV, you can still enjoy mirroring through AirPlay by installing an app such as Reflector or Air Server on your Mac or Windows computer connected to a projector. These apps even allow you to connect more than one iPad to help you see if students are on task when working in centers.
8. Zoom zoom.
Zoom is another of the built-in accessibility features of iOS. This feature is intended for users who have low vision, but it can come in handy for allowing students who sit in the back of the room to more easily see what is on the screen when you mirror it through AirPlay (see tip No. 7). Zoom is enabled in the Settings by going to General > Accessibility > Zoom. Once Zoom is enabled, double-tapping with three fingers will zoom in, and double-tapping a second time with three fingers will zoom out. You can move around the screen while zoomed in by dragging with three fingers, and you can adjust the level of magnification by double-tapping and holding with three fingers, then dragging up or down.
9.Score one for the kids.
Guided Access is another accessibility feature introduced in iOS 6. Some people call it “kid mode” because it allows you to lock the iPad in a single app before you hand it to a child. As with other accessibility features, you must first enable Guided Access by going to Settings > General > Accessibility and choosing Guided Access. There you will also set up a passcode for exiting Guided Access and returning the iPad to its normal mode of operation. Once you have it enabled, you can start Guided Access at any time by opening the desired app and triple-clicking the Home button. The screen will appear to shrink in and the Guided Access options will be displayed at the bottom. Before you tap Start, you can also circle any buttons or other controls you do not want students to access. These will then be grayed out when you tap Start and the iPad is in single-app mode. When the iPad is in Guided Access mode, tapping the Home button will not allow students to close the current app. Only triple-clicking Home, entering the passcode, and tapping “Done” will return the iPad to its normal mode.
10. Read(er) all about it.
Although it only works on certain sites (such as blogs and news sites) the Reader feature of Safari introduced in iOS 5 simplifies the display of a Web page for students who might be easily distracted. You will know a site supports this feature when a “Reader” icon appears in the address bar. Tapping this icon will remove ads, navigation bars, and other items that can distract the student from the content of the page. Reader works great with Speak Selection (see tip 6) to allow students to focus on the text as they hear it read aloud.
11. Take it to go.
Reading list is a feature of the Safari browser that allows you to save web pages so you can finish reading them later when you have more time. In iOS 6, Reading List can save entire web pages so you can catch up on your reading even when you are offline. Students can use this feature to save web pages they need to read on their commute to school, when they may not be connected to a network.
12. Content (creation) is king.
In my opinion, the true power of the iPad as an educational device comes through when students are allowed to use it to create content. In our session at FETC 2013, we featured a number of apps that facilitate content creation with iPads, including: iMovie and Garageband for iOS, Book Creator for iPad, Snapseed, Educreations, Explain Everything, Ask3, Inspiration Maps, Keynote, and Haiku Deck. While some of these apps are not free, the flexibility they offer for working with a number of different topics and subject areas makes them well worth their cost. A key concept of universal design for learning (UDL) is to provide options for how students show what they know, and these apps allow students who may not be able to express themselves in writing to show their understanding through other types of representations, such as digital books, movies or presentations. For teachers, these apps present another way to present content in a way that is engaging and appeals to different learning styles.