Building a Class Helper: A Proposal, Part 1 of 3
- By Emmett Dulaney
- 02/03/16
Sometimes there is a huge gap that develops between identifying a need and being able to solve it. That gap can be formed by technology, administration, budget, policies or any of a seemingly endless number of other factors. In this case, I have identified a significant need that exists within the classroom but the biggest consideration allowing the gap to continue to exist is my own shortcoming when it comes to programming. I have mocked up a tool that works for me (using an old version of Visual Basic), but it lacks the ability to expand beyond my own needs.
Rather than allow the concept to languish, it is my hope that someone will be able to pick it up and work with it to create a product that others can utilize and benefit from. In an attempt to be as linear in explanation as possible, I will first outline the need that exists, followed by some history of the development and then a proposed structure.
The Need for a Multi-Purpose Classroom Tool
When walking into the classroom, there are a number of tasks that may need to be done. While all of these tasks can be accomplished without the use of any technology, technology can both simplify and streamline them. Given that every classroom is different, the technology that you have access to can fluctuate, and Internet access is never assured, the best solution is a self-contained application that can run from a flash drive.
Titled Class Helper for lack of a better moniker, there are nine tasks that the tool should be able to do:
- Take attendance;
- Sequentially call on a student;
- Randomly call on a student;
- Selectively pull students from a pool;
- Keep track of participation;
- Require a response within a given timeframe;
- Randomly create groups;
- Create a randomized seating chart; and
- Send notes to a student or group of students.
Some of these functions can be done within various learning management systems (Moodle, for example, has an attendance module), but none of the nine can be done well and with minimal resources. Beginning in the next section, each of these functions are elaborated upon with an examination of what functionality is needed with each. Before getting to that, however, a mockup of the interface is necessary. As shown in Figure One, there are not a lot of graphics — this enables the application to be small and run on almost any Windows-based PC that happens to be available in the classroom.
The leftmost column allows the instructor to choose which class they are currently in (where these values come from will be addressed in the structure discussion in a future article), while the next column allows the choice of displaying either student names, their image or both. Displaying names only can be useful if you are projecting the application for others to see and have students who are self-conscious or shy and not comfortable having their images displayed. Choosing to display only the image can be helpful at the beginning of the semester when you are trying to learn student names.
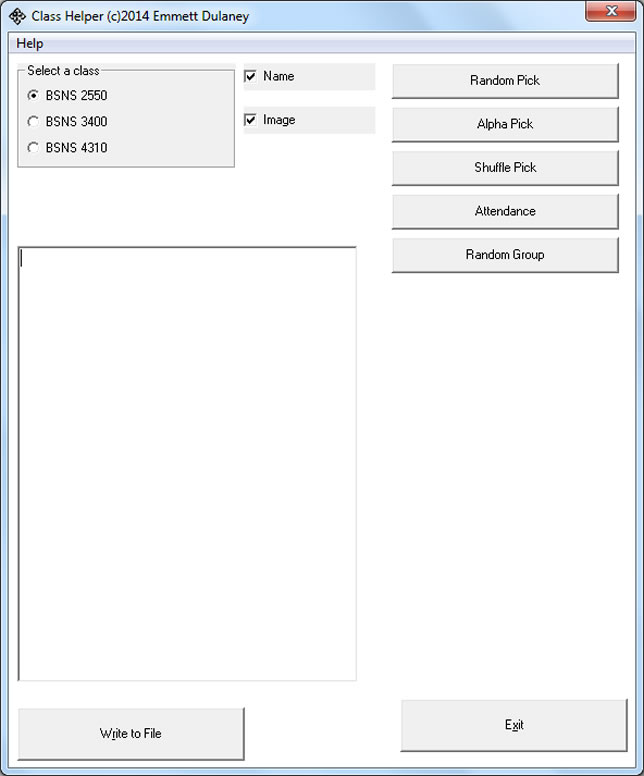
FIGURE ONE: The opening interface of the Class Helper.
Clicking on the Attendance action button will display a frame with checkboxes of all the students in the class (as shown in Figure Two). Check the box for those that are absent and click the Record button: a message will display indicating that a file was created and the checkboxes will go away. In reality, there are two values that are written. The first thing that happens is that a text file is created — the name of the created file is equal to the name of the class ("BSNS 2550" in this case), the word "ABSENT" and the date ("9_30", in this case). The file is stored on the flash drive beneath the attendance folder for the class and can be viewed at any time. If you need to change attendance (for example, a student who was absent suddenly shows up), you can repeat the process (all new files overwrite older ones), or edit the text file manually (with Word, WordPad, Notepad or any similar program). Referring back to this file at any point in the semester, you can quickly see who was absent on any given day.
The second thing that happens is that an entry is appended to a file that exists solely for this student. This allows you to bring up any student and see their total absences expressed in terms of the days they were not there.
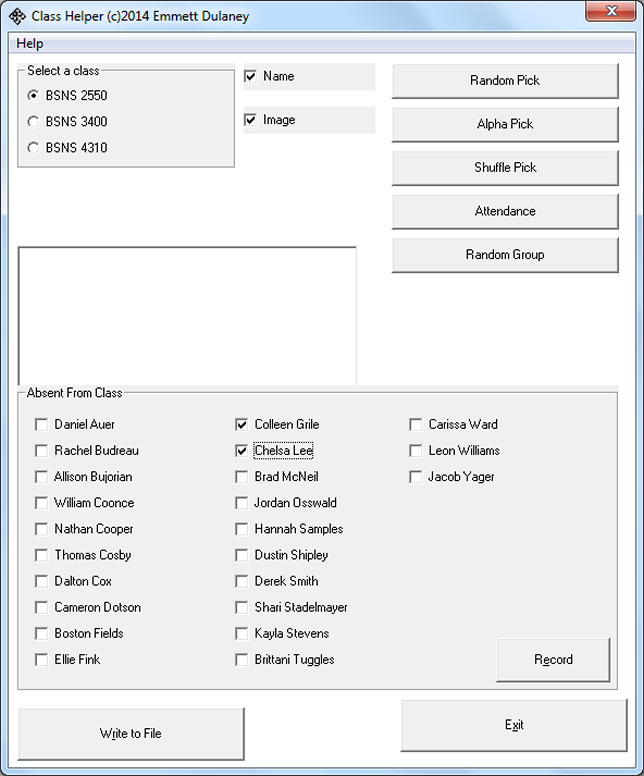
FIGURE TWO: Taking attendance within the Class Helper.
To use the analogy of students in the classroom being entities in a pool, the "Alpha Pick" option brings up the alphabetically first student and removes them from the pool. As the instructor continues to click on this button, one student after another is brought up (see Figure Three) and removed from the pool so that you cannot call on the same student twice.
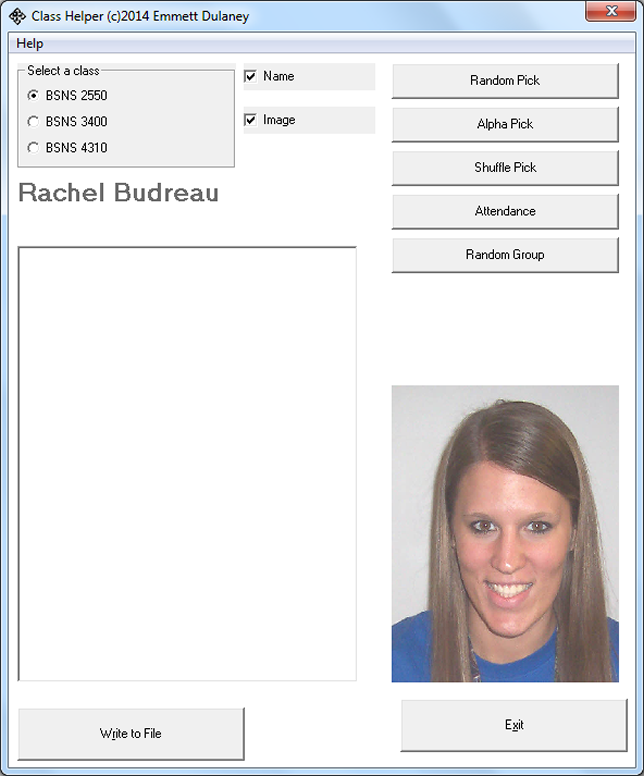
FIGURE THREE: The student to call upon is shown.
The name of the student appears above the large text box and their image to the right as long as both Name and Image are selected for display. Unchecking either of those entries keeps that item from appearing. Within the large text box, it is possible to write any value that you want (such as "Unprepared for class," "Excellent input," "Volunteered to bring treats next Friday," etc.) and then click the Write to File button. The files created are text-based notes that you can refer to after class is over within any editor and choose to print, save or discard.
Randomly Calling on a Student
Anyone who has ever sat in a classroom can attest that alphabetically going through the student roster gets old rather quickly. Two methods of calling on students — and truly randomizing how you do so — are represented by the "Random Pick" and "Shuffle Pick" options.
The Random Pick button works much like Alpha Pick except it randomly moves through the list of students and, once they have been selected, removes them from the pool so that you do not run the risk of calling on the same student more than once. In order for any of the calling-on-student options to work properly, the instructor needs to take attendance first. By checking the boxes indicating that the students are absent, they are removed from that day's copy of the student pool.
The Shuffle Pick button, on the other hand, randomly selects a student and leaves them in the pool. Thus every student has an equal chance of being selected and therefore needs to remain engaged for the whole class period even if they've already answered a question (there is, however, a safety feature that keeps the exact same student from being chosen twice in a row, back-to-back). This option also acts as if it is shuffling by displaying multiple students in a sequence before stopping on the one to call upon.
Of all the features in the Class Helper, the ability to randomly call on students is my favorite. In the absence of it, no matter how unbiased I attempt to be in a large classroom it seems as if there are some students who always get called on often (either because they are raising their hands, disrupting others, or otherwise drawing attention) and some who slide by unnoticed too often.
Selectively Pulling Students from the Pool
There can be times when you want to exclude students from activities. This could be because they are making up an assignment, on an excused trip or doing something that would prevent them from otherwise engaging in what the rest of the class is doing right now. When that is the case, they can be excluded from the pool by using the Attendance feature but not saving. Checking the box beside their name excludes them from the pool of other students without actually identifying them as absent.
Keeping Track of Participation
While it is possible to type values into the text box and save them to measure participation, this can be time consuming. An alternative method is to use an attendance-like feature of checkboxes and select those students who participated in class (or did a stellar job of so doing) on that given day. This can be useful when a portion of the students' grades are based on their involvement.
Requiring a Timed Response
When using any of the call-on-a-student options (Random, Alpha, Shuffle), it is possible to initiate a timer once they have been selected that requires them to answer a question within a given timeframe. This can be useful, for example, when devoting a period to exam review and wanting a definition from them in 30 seconds or less.
Allowing the timer to do the dirty work keeps the instructor from needing to manage the time or impatiently wait on students who clearly don't know the answer but hems and haws around it. It also allows something else to cut students off in midsentence and treats everyone fairly.
Randomly Creating Groups
Just as it can be difficult to randomly call on students in the classroom, it can be equally problematic trying to assign them to groups for class projects, study sessions and so on. The Random Group option brings up a dialog box allowing you to specify the size of the groups you want to create, as shown in Figure Four.
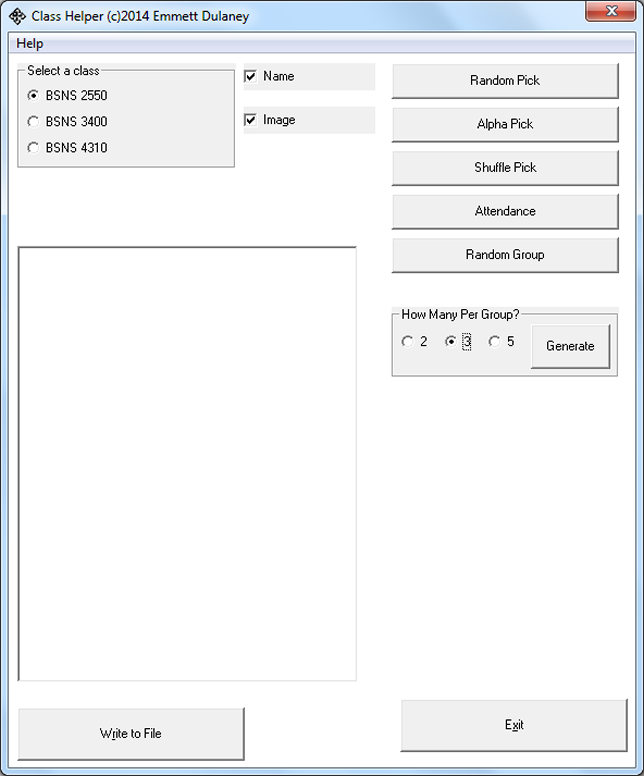
FIGURE FOUR: Select the size of groups you want to create.
After choosing the size of the groups, click the Generate button and the group members — delimited with semicolons — automatically populate the text box (see Figure Five) allowing you to optionally click Write to File and save what is generated to a file for later reference (with a name such as "Audit Groups," "Groups for Papers," "Review Groups," "Buzz Groups," etc.).
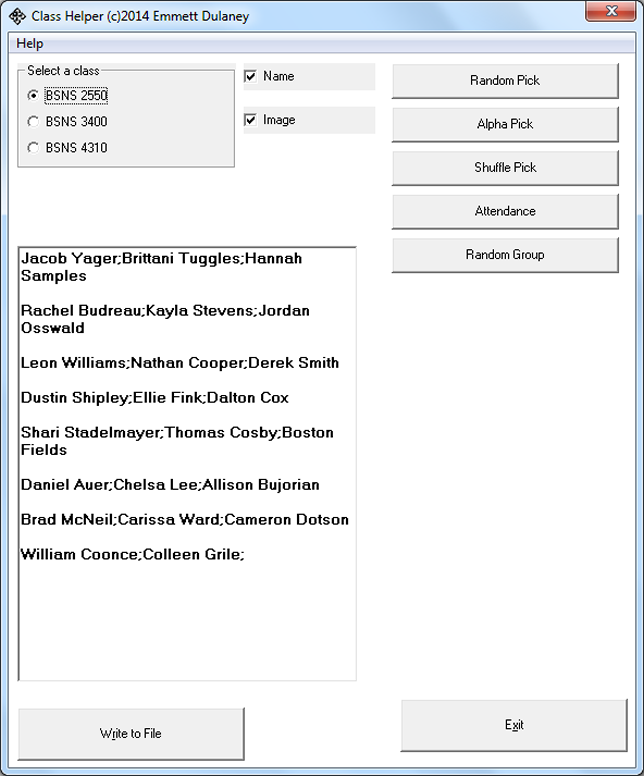
FIGURE FIVE: Member assignments to the groups are displayed in the text box.
Since the values within the text box are temporary, they can also be manipulated. If, for example, you did not want a group of only two (as is the case with Figure Five), with the keyboard you could move those two to other groups before choosing to save the file.
Some groups created are intended to be of short duration (this class only) while others are meant to last much longer (working together for the whole semester). For that reason, it is important to decide whether students who are absent today are included in the group assignments before creating the lists. If you take attendance before generating the groups, absent students are excluded. If you generate the groups before taking attendance, they are included.
You can also change the groups if you like by re-running the tool — either to get different groups or groups of different sizes.
Creating a Random Seating Chart
Building off of the randomization features (selecting students, creating groups, etc.), there are times when a randomized seating chart is needed — such as when the final or other exams are being administered. Since it is rare to find the configuration of any two classrooms the same, the best approach to this is as a matching exercise. By entering a designation for each seat in the classroom ("Row 1, Seat 1", for example), the pool of students can be randomized and then matched with seat values as shown in Figure Six.
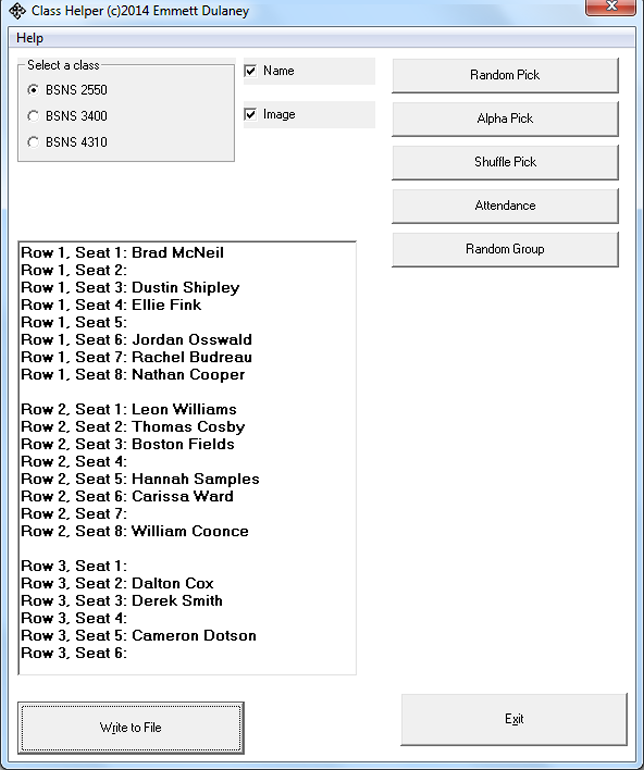
FIGURE SIX: Random seating assignments are generated.
If you want to leave certain seats blank — for example always making certain there is an empty seat on either side of the test taker - then populate your seating chart only with even or odd values (for example, "Row 1, Seat 1", "Row 1, Seat 3", and so on) before doing the matching. This works if you need to make accommodations for broken chairs, missing desk parts, etc.
Sending Notes
Regardless of any other function that you may be doing, the Write to File button is always present and will allow you to save any values currently in the large text box. While this can be useful for saving such things as randomized groups and seating assignments, it can also be used to save a file to later send to students (all, those absent or any subset).
Clicking the button brings up a prompt for a file name, the default of which is "tmp" and the date, but it can be changed to any string value (see Figure Seven).
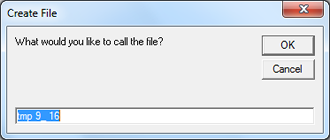
FIGURE SEVEN: A text file can be created to later send to students.
Being a text file, it can be directly imported into any email program as the passage to be sent, or it can be attached and mailed.
Continuing this Discussion
The purpose of this article was to outline nine features that a simple self-contained executable application could perform in the classroom. In Part Two, a structure for the application — based on the prototype — will be discussed and Part Three will conclude the dialog by examining other possible enhancements and suggestions.